Ultimate Git Cheatsheet

Over the years I’ve been using Google-fu, Stack Overflow, books and even AI to try and find whatever I need to make git work for me.
While I have re-searched the same questions over and over, I finally decided to simply store all the information I need in a blogpost to make my own personal cheat sheet.
I hope this helps whoever reads it as much as it does me!
Happy scripting 😊
#AzureSupport
1. What is Git
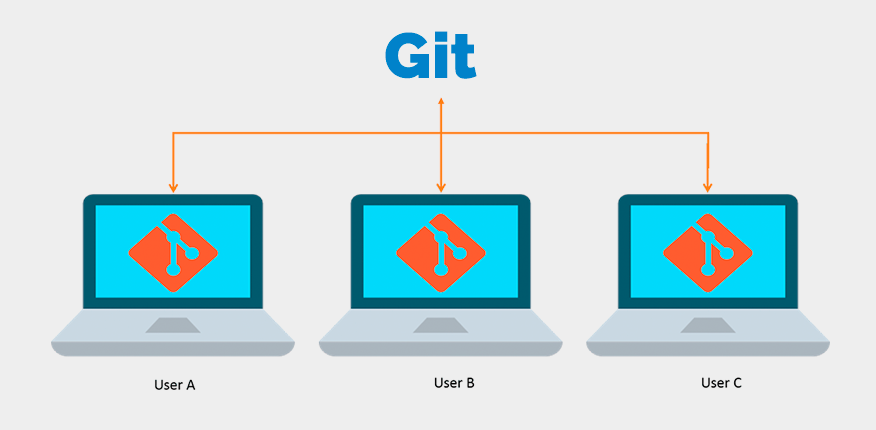
Git is a version control system that tracks file changes and facilitates collaboration, enabling multiple people to work on the same project while preserving a complete history of changes.
The main point of git is that every user can have his/her own fully working copy of code on their machine, while still providing the flexibility of working together on a code project.
2. Setting up Git
Install Git
- Download from Git official website or install via package manager (e.g.,
wingeton Windows,brewon macOS,apton Linux).
On Windows you can use:
winget install --id Git.Git -e --source winget - On Windows, be sure to add it to system PATH
Configure Git
Before using Git, you need to configure your user information, so that you can see who commited the changes to the system.
You can do this by configuring your user name and user email address:
git config --global user.name "Your Name"
git config --global user.email "your.email@example.com"
git config --list
While we’re configuring git, sometimes under Windows you run into a file path limit.
This can also be resolved through git configuration
git config --system core.longpaths true3. Working Copy, Staging Area, and Repository
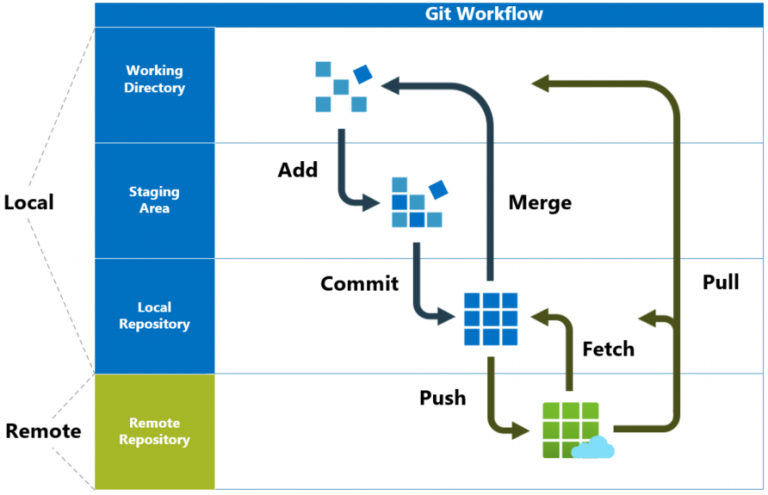
Git uses the concepts of Working Area (also known as Working Directory or Workspace), Staging Area and Local Repository on your local machine to explain where a change is currently located.
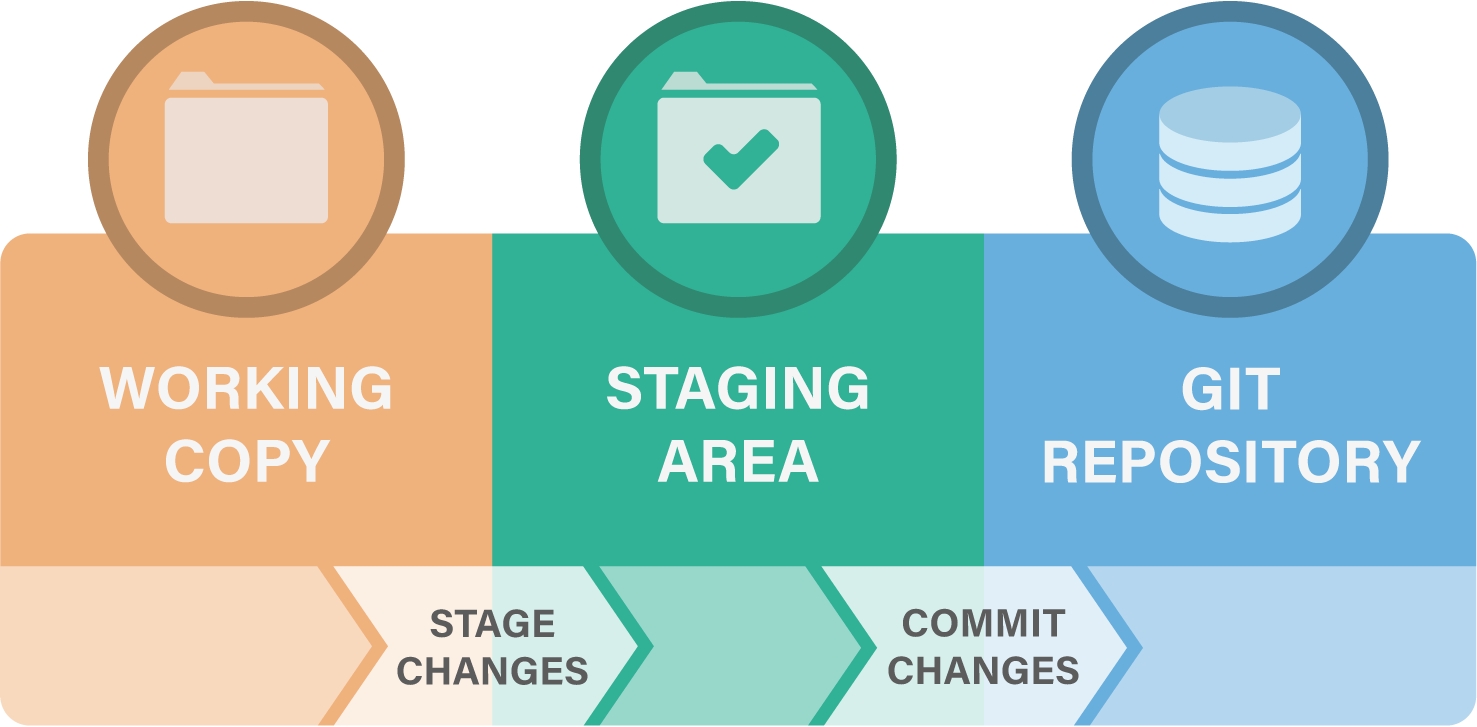
Working Copy
This is the area where files in your project reside. When you make changes to files and press Save, they are reflected here, but they are not yet ’tracked’ by Git.
Staging Area
The staging area is where you prepare changes before committing them.
Think of it like this: you’ve been working on a document a while, you’ve saved it 10 times, making quality changes or content updates all the time, but now you have an actual v1 of the file.
When you run git add, the changes are moved from the working copy to the staging area.
Local Repository
You’ve made the changes to your file, you’ve staged them, but now you want to “commit” them to the local repository.
Once you commit, changes from the staging area are added to the commit history of the local repository. The commit history is a permanent log of all committed changes done on the local repository.
A commit can be single files, but also a collection of file modifications all leading to a single commit.
Once committed, you can move back and forward through the commit history to see exactly what has been modified during every commit.
Example Workflow
- Make changes to files in the Working Area.
- Stage the changes by using
git add, moving them to the Staging Area. - Commit the staged changes, moving them to the Local Repository.
4. Basic Git Commands
Initialize a Git repository
This will tell git to treat the current directory . as a git repository, causing it to create a .git folder which will in turn keep track of whatever happens in that folder
git init .Checking the status
This command will be your bread and butter, showing you exactly what files have changed and what their current status is
git statusStaging changes
Add a single file to the staging area
git add <file>Add changes in the current directory recursively (both tracked and untracked) to the staging area
git add .Add all changes (both tracked and untracked) in the repository to the staging area
git add -ACommitting changes
This step will commit all changes in the staging area to a point in the commit history with a speficied message
git commit -m "Your commit message"In case you want to just commit a single file, this is also possible
git commit ImportantFile.md -m "Adding Important document for sales"In case you’ve just made a commit but you accidentally forgot this 1 file that’s crucial for the commit, you can amend the commit:
# Edit hello.py and main.py
git add hello.py
git commit -m "added all required python files"
# Realize you forgot to add the changes from main.py
git add main.py
git commit --amend --no-edit
The --no-edit switch means that you don’t want to edit the message, just add the file to the commit.
Do note that you want to make your commit message as descriptive as possible, making sure to explain what will happen if you commit these changes.
For example: Fixes typo's in readme.md documentation or Adds feature X to my awesome application.
If you really want to be fancy, be sure to add keywords so you can resolve work items in Azure DevOps or linking a Pull Request to an issue using keywords in GitHub.
Going in reverse, undoing changes
You want to undo the last commit you’ve done and go back to staged instead
You accidentally went to fast, commited something locally that you didn’t mean or missed something.
Using a soft reset, there’s an easy way back:
git reset --soft HEAD~1For more information about HEAD, please follow the link for more detailed use cases.
Unstaging a file back to Working Copy
In case you’ve staged a file to the staging area, but don’t need to or want to do this (perhaps this change should be in its own branch or commit):
git restore --staged <filename>Revert a file back from changed to the last known version in the commit history
In case you accidentally changed and saved a file locally, but need to revert back to the last change known
git clean <filename>Do note that his is a DESTRUCTIVE action and will undo the local save.
When doing this, you will be unable to get the change back.
This is similar to the Discard Change button within VSCode, just without the confirmation warning.
Because of this, you will need to add the -f switch to force clean the file:
git clean -f <filename>You can also use the -q switch in case you don’t want to be informed which file has been cleaned and just use Quiet mode.
5. Basic local Git Workflow
- Modify files.
- Check file status with
git status. - Stage changes with
git add. - Commit changes with
git commit.
6. Viewing Commit History
Commit messages are great, but you will never see them again right?
Wrong, you can find back all commits in the git log, showing you a timeline of all commits for your repository.
Depending on how large your commit history is, or if you’re actively working with branches, you might want to use a more fancy display of your git log.
Git log also introduces the concept of HEAD, which will be explained in a later chapter.
Basic Log
This will show a very verbose log, displaying all commits including the full commit SHA, Author, Date and Message.
git logSimplified Log
This will show you a less verbose version, but will most probably be more than enough for you to track down what you’re looking for.
git log --oneline
Visual Log with Graph
Once you start actively working with branches, this might be the log for you!
git log --graph --oneline --all --decorate7. Understanding HEAD in Git
HEAD points to the latest commit in the active branch. It represents the state of the working directory.
HEAD: This represents the latest commit on the current branch.~1: This indicates the first parent of theHEADcommit. Essentially, it means “one commit beforeHEAD.”
So, HEAD~1 is the commit immediately preceding the current commit. You can also use other numbers to refer to earlier commits, such as HEAD~2 for two commits before HEAD, and so on.
Example
If your commit history looks like this:
* commit 3 (HEAD)
* commit 2
* commit 1HEADpoints tocommit 3.HEAD~1points tocommit 2.HEAD~2points tocommit 1.
This notation is useful for commands like git reset, git checkout, and git rebase when you need to reference previous commits.
Detached HEAD
When you check out a specific commit instead of a branch, you enter a detached HEAD state, meaning HEAD is not pointing to any branch.
8. Stashing changes
git stash is a powerful command that allows you to temporarily save (or “stash”) changes you’ve made to your working directory so you can work on something else, and then come back and re-apply them later.
When to Use git stash
- Switching Branches: When you need to switch branches but have uncommitted changes that you don’t want to commit yet.
- Context Switching: When you need to quickly switch context to work on something else, like fixing a bug, without losing your current work.
- Keeping Work Clean: When you want to keep your working directory clean without committing incomplete work.
Best Practices
- Descriptive Messages: Use descriptive messages when stashing changes to easily identify them later.
- Regular Cleanup: Regularly clean up your stash list to avoid clutter.
Examples
-
Stashing Changes:
git stashThis command stashes your changes and reverts your working directory to the last commit.
-
Stashing with a Message:
git stash save "TODO: Implementing new feature"This command stashes your changes with a descriptive message.
-
Listing Stashes:
git stash listThis command lists all stashed changes.
-
Applying Stashed Changes:
git stash applyThis command reapplies the most recent stash without removing it from the stash list.
-
Popping Stashed Changes:
git stash popThis command reapplies the most recent stash and removes it from the stash list.
-
Dropping a Stash:
git stash drop stash@{0}This command removes a specific stash from the list.
9. Working with Branches

Branching allows you to ‘branch’ your codebase so that it can grow and provide new features to your code.
It allows you to ‘protect’ your codebase from unwanted changes (for example when you’re code it used in a production environment), while still allowing development to be made to make the codebase better.
Usually your main branch (also called trunk) will aptly be called main, while any subsequent branch will be called whatever you want it to be.
Do note that it might be handy to implement a branch naming strategy to keep everything organized.
If everything goes well, your branches will allow for further code growth and will eventually merge back into main, causing your project to grow bigger and better.
Creating a branch
Creating a new branch will split off from the currently selected branch.
Be sure to first select the correct branch you want to split off from, by using
git checkout <branch-name>followed by
git branch <branch-name>to create your desired branch.
For example
git checkout main
git branch featureA
Do note that you can also create ’layers’ of branch names which in certain tools (such as Azure DevOps or GitHub) can group branches as a sort of folder structure:
git checkout main
git branch feature/bgates/new-button-home-page
Tools can group all feature branches together and all underlying user branches as well, proving a quick and easy overview of development on the current repository.
Switching to a branch
As mentioned before, you can easily switch from branch to branch by using
git checkout <branch-name>Creating and switching in one command
Instead of having to first use git branch <branch name> followed by a git checkout <branch name>, you can also use the following command to do both at the same time:
git checkout -b <branch-name>
Merging a branch back into main
Once you’ve done all the development/bug fixing you want to in the separate branch, you want to merge the changes back into main to make sure your production code will have these improvements as well.
git checkout main
git merge <branch-name>
Deleting a branch
Once you’ve merged all the changes from a branch back into main, you can safely remove the branch, as all its changes are now in main as well.
You can do this using the following command
git checkout main
git branch -d <branch-name>
Do note that if you’ve merged the changes using the Squash Merge technique, git will not automatically recognize that you’ve gotten all the new changes, so a forcefull delete of the branch will be required.
In case changes have NOT been confirmed to be in main, this can be a destructive action and can not be restored, so be careful!
In case you’ve confirmed that main is up-to-date, you can remove the old branch by using
git checkout main
git branch -D <branch-name>
Interactive Exercise:
- Initialize a repository.
- Create a new branch, make changes, and commit.
- Merge your branch into the main branch.
10. Compare Changes and Branches
In order to compare changes and branches, git offers a function called git diff.
Here are some common examples on how to use this tool to see what changes exist between common areas in git.
Checking Differences in the Working Copy
To see changes you made in your working copy compared to the last commit:
git diffComparing Staged Changes
To see the differences between the files in the staging area and the last commit:
git diff --stagedComparing Branches
To compare how the feature branch differs from main:
git diff main..featureThis will show you the differences between the two branches. You can use this to see what commits or changes are in one branch that are not yet in another.
11. Types of Merges
Merging within git can be confusing for those new to git and it’s often tricky to work out which the “correct” option is at any given time. It doesn’t help that the names don’t give too much insight without prior knowledge of git terminology.
Firstly it’s it’s important to note that all of these have their own advantages and disadvantages, it’s more about what best suits the team and their current needs rather than any absolute best option.
Below is a breakdown of what each type does, along with diagrams to help explain the process of each for clarity.
Example to use
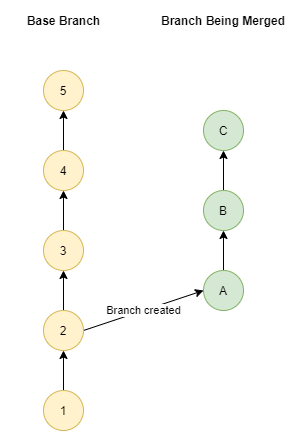
Here’s what we’ll use as our sample Git repository.
We have 2 branches, the base branch where the merge is going into (e.g: main, or release) and the branch being merged.
The branch being merged was created at commit 2, so contains commits 1,2,A,B,C
The base branch has had changes made since the new branch was made: 3,4,5.
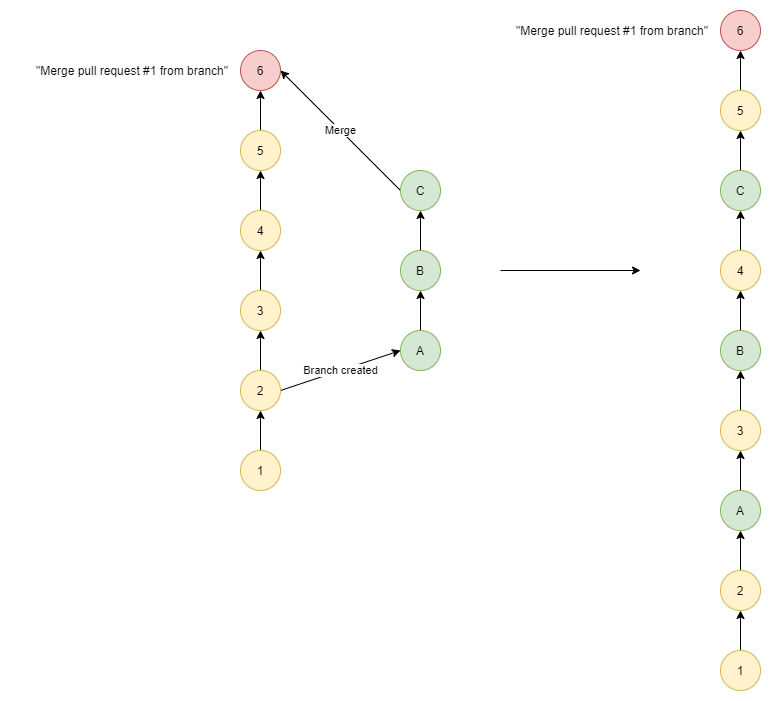
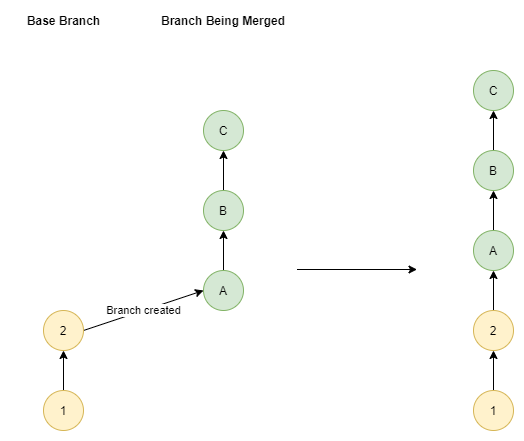
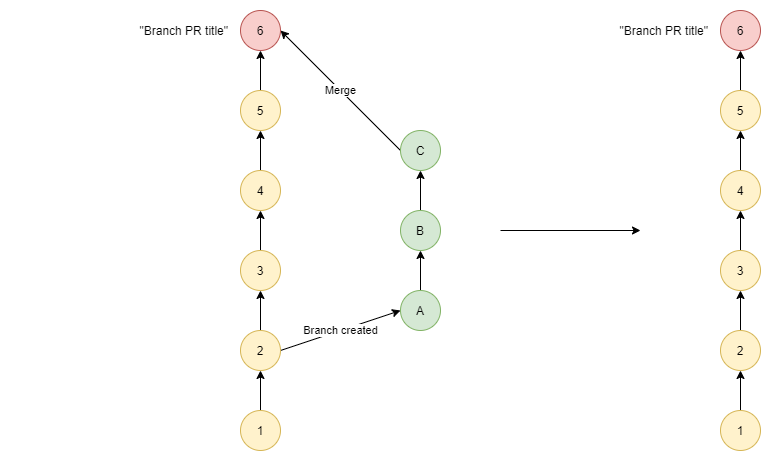
Standard Merge
A standard merge will take each commit in the branch being merged and add them to the history of the base branch based on the timestamp of when they were created.
It will also create a merge commit, a special type of “empty” commit that indicates when the merge occurred.
This is also sometimes called a No Fast Forward or --no-ff merge
# Switch to the main branch
git checkout main

# Merge the feature branch into main
git merge feature
Advantages:
- Most descriptive and verbose history, tells us exactly when things happened, helps give the best context about code changes
- Allows us to see a graph of when branches were made using git log –oneline –graph which can help understanding why changes were made and when
- Allows us to see each commit that made up the eventual merged changes, no loss of granularity
Disadvantages:
- Merge commits are often seen as messy as they are empty and only really there for historical reasons. Can be especially confusing if you are trying to revert a set of changes.
- Can end up having a complex graph of previous branches that’s more difficult to read
Fast-Forward Merge
If we change our example so no new commits were made to the base branch since our branch was created, Git can do something called a “Fast Forward Merge”. This is the same as a Merge but does not create a merge commit.
This is as if you made the commits directly on the base branch. The idea is because no changes were made to the base branch there’s no need to capture a branch had occurred.
# Switch to the main branch
git checkout main

# Merge the feature branch into main with fast forward
git merge --ff-only feature
Advantages:
- Keeps a very clean commit history
- Allows us to see each commit that made up the eventual merged changes, no loss of granularity
Disadvantages:
- Can only be done when the base branch hasn’t had any new commits, a rarity in a shared repository
- Can be seen as a inaccurate view of history as it hasn’t captured that a branch was created, or when it was merged
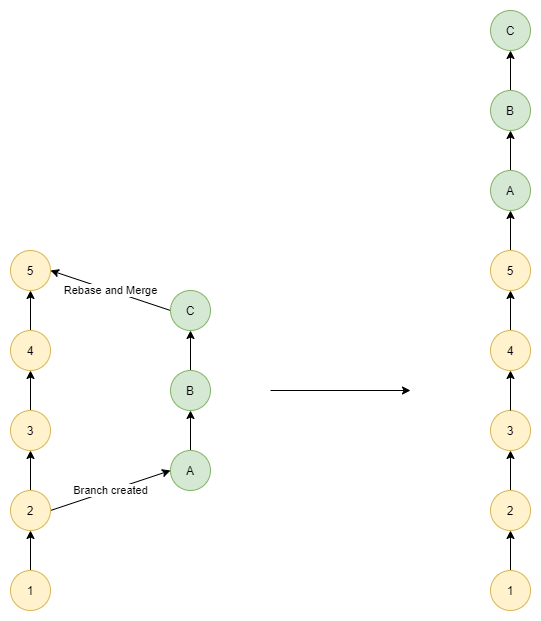
Rebase and Merge
A rebase and merge will take where the branch was created and move that point to the last commit into the base branch, then reapply the commits on top of those changes.
This is like a fast forward merge, but works when changes have been made into the base branch in the mean while.
# Switch to the feature branch
git checkout feature

# Rebase the feature branch onto main
git rebase main

# Switch back to the main branch
git checkout main

# Merge the rebased feature branch into main
git merge feature
Advantages:
- Keeps a very clean commit history
- Keeps the individual commit granularity
Disadvantages:
- Can cause frustration as, if someone was to commit to the base branch against before you get to merge, you have to rebase again
- Can be seen as a inaccurate view of history as it hasn’t captured that a branch was created, or when it was merged
- Difficult to see which commits relate to which PR / branch
Squash Merge
Squash takes all the commits in the branch (A,B,C) and melds them into 1 commit. That commit is then added to the history, but none of the commits that made up the branch are preserved
# Switch to the main branch
git checkout main

# Squash and merge the feature branch into main
git merge --squash feature

# Commit the squashed changes
git commit -m "Squash merge feature branch into main"
Summary
- Standard Merge: Creates a merge commit, preserving the history of both branches.
- Fast Forward Merge: Moves the branch pointer forward, creating a linear history without a merge commit.
- Rebase and Merge: Reapplies commits from the feature branch onto the main branch, creating a linear history.
- Squash Merge: Combines all commits from the feature branch into a single commit, simplifying the history.
Each merge strategy has its use cases, and the choice depends on your project’s workflow and history management preferences.
12. Collaboration with Git
Cloning a repository
To start collaborating on a project, you first need to clone the repository.
A clone will create a full blown copy of the repository on your device for you to play with.
It will automatically configure all files as currently in the repository, as well as configure the source of the clone to be a remote repository called origin, so you can pull and push any future updates from and to it.
git clone <repository-url>This command creates a local copy of the repository on your machine in the local folder with the name of the repository.
Example:
cd c:\temp
git clone https://github.com/username/MyCoolRepository.git
This will create a clone of the repository https://github.com/username/MyCoolRepository.git and will place it in the folder c:\temp\MyCoolRepository.
If you want you can rename the folder c:\temp\MyCoolRepository to something that might be more of your liking, all git configuration will still work.
Viewing Remote Repositories
To view the remote repositories associated with your local repository:
git remote -vThis command shows the URLs of the remote repositories for fetching and pushing changes as well as their ‘shortname’.
The default shortname for the remote repository a clone was made from will be origin.
Listing All Branches
To list all branches, both local and remote:
git branch -aThis command helps you see all branches available in the repository, including those on the remote.
Pushing Changes
To push your local changes to the remote repository:
git push <remote shortname> <branchname>Example:
git push origin mainThis command uploads your commits to the specified branch on the specified remote repository.
In case you’ve just created a new branch locally and want to push it, you need to push it to the same branchname on the remote repository, hence creating it remotely.
Once this is done you can use the Pull Request logic to merge the newly created branch with another branch, such as main
Example:
git checkout -b feature/bgates/newButton
git add -A
git commit -m "Adds new button to homepage"
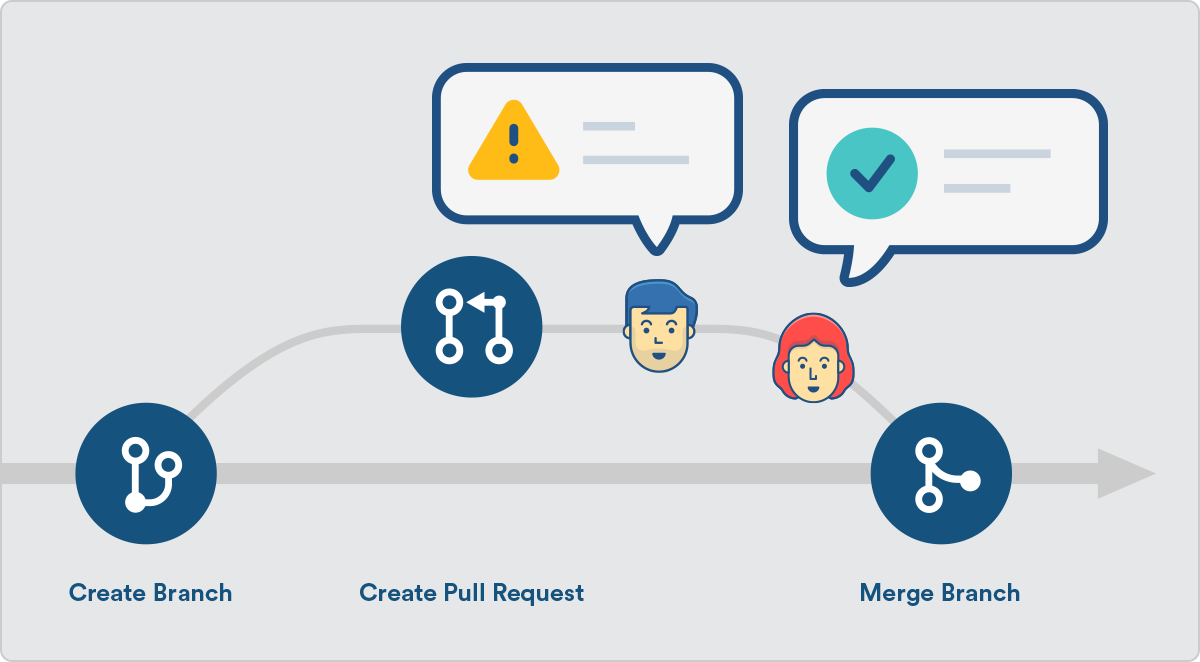
git push origin feature/bgates/newButtonPull Requests (PRs)
A Pull Request is you asking the remote repository to pull changes from a branch into another branch.
Most commonly you will ask the remote repository to pull changes from your feature branch into the main branch.
- Push the feature branch to the remote repository.
- Create a PR on the git platform (commonly Azure DevOps or GitHub) for code review and merging into
main.
Keep Branch Updated
If you’re working on your feature branch, but in the meantime collaborators have updated the main branch, you can keep your feature branch updated with the changes from main
You can do this either using a Standard Merge
# Switch to the feature branch
git checkout main

# Merge the main branch into feature
git merge main
This can also be achieved using a Rebase
# Switch to the feature branch
git checkout feature

# Rebase the feature branch onto main
git rebase main
Clones vs. Forks
Clones
- Definition: A clone is a direct copy of a repository, including its entire history.
- Use Case: Use cloning when you need to work on a repository where you have push access or when you want to contribute to a project without creating a separate copy.
Example:
git clone https://github.com/username/repository.gitForks
- Definition: A fork is a copy of a repository that is created on your GitHub/Azure DevOps account. It allows you to freely experiment with changes without affecting the original repository.
- Use Case: Use forking when you want to contribute to a project but do not have push access. You can make changes in your fork and then create a pull request to merge them into the original repository.
Example:
-
Fork the repository on Azure DevOps or GitHub.
-
Clone your fork:
git clone https://github.com/yourusername/repository.git -
Add the original repository as a remote (where
upstreamis a remote name of your choosing):git remote add upstream https://github.com/originalusername/repository.git -
Fetch changes from the original repository:
git fetch upstream -
Merge changes from the original repository into your fork:
git merge upstream/main
13. Git Fetch vs. Git Pull
There are some slight differences between git fetch and git pull, as highlighted here:
Fetch
git fetchDownloads changes without modifying your working directory.
Pull
git pullFetches and merges changes from the remote repository into your local repository.
Pruning Deleted Branches
git fetch -pFetches all changes from the remote repository including new and deleted branches. It will notify when a branch has been remotely deleted, but will not delete the local copy of the branch.
14. Handling Merge Conflicts
Merge Conflicts
Conflicts happen when two branches modify the same part of a file, and Git cannot automatically resolve them.
This normally only happens when changes are made in the same section of a file.
Identifying Conflicts
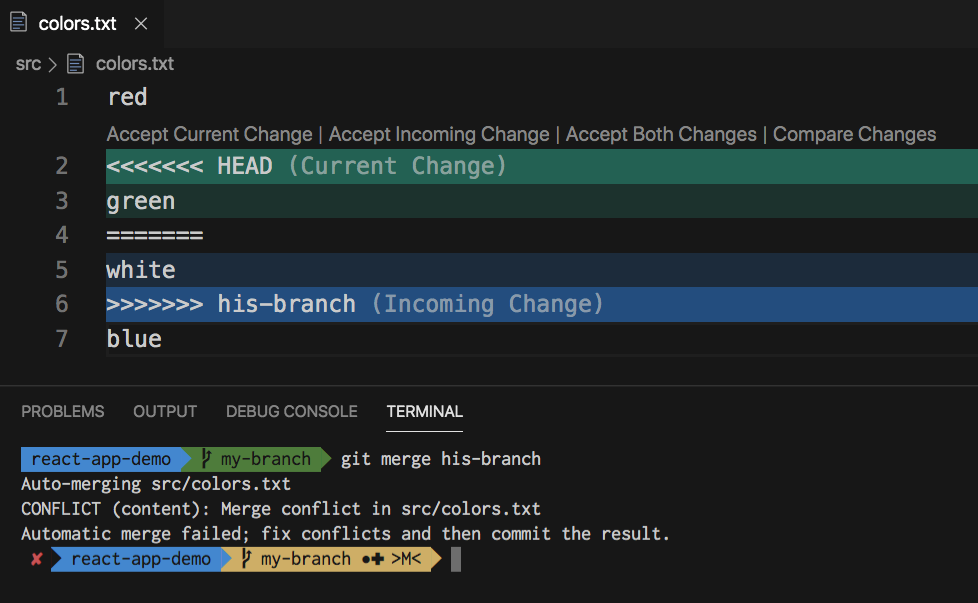
git merge <branch-name>When a merge conflict occurs, Git marks the conflict in the affected files with the following markers:
<<<<<<< HEAD: Indicates the start of the conflicting changes from the current branch.=======: Separates the conflicting changes.>>>>>>> branch_name: Indicates the end of the conflicting changes from the branch being merged.
Steps to Resolve Merge Conflicts
-
Identify Conflicted Files:
git statusThis command lists all files with conflicts.
-
Open the Conflicted File:
Open the file in your text editor to see the conflict markers.
-
Resolve the Conflict:
Edit the file to resolve the conflicts by choosing the correct changes or combining them.
Example:
<<<<<<< HEAD
// Code from the current branch
=======
// Code from the branch being merged
>>>>>>> feature-branch
After resolving:
// Combined or chosen code -
Stage the Resolved File:
git add <file> -
Commit the Merge:
git commitThis command finalizes the merge after resolving conflicts.
Example Scenario
-
Create a Conflict:
git checkout -b feature
echo "Feature code" >> file.txt
git commit -am "Add feature code"
git checkout main
echo "Main code" >> file.txt
git commit -am "Add main code"
git merge feature
This will create a conflict in
file.txt. -
Resolve the Conflict:
Open
file.txtand resolve the conflict:<<<<<<< HEAD Main code ======= Feature code >>>>>>> featureResolve it to:
Main code Feature code -
Stage and Commit:
git add file.txt
git commit
15. Common Mistakes
Working with git is a recipe for failure and disaster 🥲🤣 Just accept that things can go wrong, but there are more often than not ways to resolve these issues without loss of work.
Some examples of things that can go wrong when working with git (there’s even a whole website dedicated to things like this)
Committing a File to the Wrong Branch
Issue: You accidentally commit changes to the main branch instead of the featureA branch.
Solution:
-
Create a new branch from the current state of
main:git checkout -b featureA -
Reset
mainto the previous commit:git checkout main git reset --hard HEAD~1 -
Push the reset
mainbranch to the remote repository:git push --force origin main
Accidentally Pulling main into a Feature Branch
Issue: You accidentally pull main into your feature branch instead of checking out main first.
Solution:
-
Undo the merge:
git reset --hard HEAD~1 -
Reapply your feature branch changes:
git cherry-pick <commit_hash>Replace
<commit_hash>with the hash of your feature branch commit(s).
Resetting a Branch to the Latest Status of Remote origin
Issue: You want to reset your local branch to match the latest state of the remote origin.
Solution:
-
Fetch the latest changes from the remote repository:
git fetch origin -
Reset your local branch to match the remote branch:
git reset --hard origin/<branch_name>Replace
<branch_name>with the name of your branch.
Undoing the Last Commit
Issue: You want to undo the last commit but keep the changes in your working directory.
Solution:
git reset --soft HEAD~1Removing a File from Git Without Deleting It
Issue: You accidentally added a file to Git that you don’t want to track.
Solution:
-
Remove the file from the staging area:
git rm --cached <file> -
Add the file to
.gitignoreto prevent it from being added again:echo <file> >> .gitignore
Editing the Last Commit Message
Issue: You need to correct a typo or add more information to the last commit message.
Solution:
git commit --amend -m "New commit message"16. Complete Workflow Example
-
Create a new branch:
git checkout main git pull origin main git checkout -b <feature-branch> -
Make changes to files.
-
Check which files have changed:
git status -
Stage all changes:
git add -A -
Commit the changes:
git commit -m "Implemented new feature" -
Push changes to the new remote branch:
git push origin <feature-branch> -
Create a Pull Request (PR) on GitHub or Azure DevOps to merge the changes into
main. -
Approve the PR and merge the branch into
main. -
Delete the feature branch on the platform.
-
Switch to
main:git checkout main -
Pull the latest changes to
main:git pull origin main -
Prune deleted branches:
git fetch -p -
Clean up the local feature branch:
git branch -d <feature-branch>Do note that in case of a Squash Merge, git will inform you that a normal delete will not be possible (due to history rewrite). In this case you will need to forcefully remove the local feature branch using
git branch -D <feature-branch>
17. Best Practices
- Commit often: Small, frequent commits make it easier to track changes.
- Write meaningful commit messages: Use clear, descriptive messages.
- Feature branching: Use branches for new features and merge them into
mainwhen complete. - Keep branches updated: Regularly pull changes from
mainto avoid conflicts. - Avoid force-push: Use it carefully; it overwrites history and can confuse collaborators.
- Avoid large, complex merges by merging smaller changes frequently.
- Use Pull Requests: Enable code review and collaboration before merging.
- Squash commits for clean history in
main. - Prune branches: Use
git fetch -pto remove local branches that no longer exist on the remote.
18. Tools to work with git
When working with PowerShell
If you’re a frequent PowerShell user and want to use git, this will be available out-of-the-box.
During the installation of git, it will be added to the system PATH (on Windows), allowing PowerShell to access it from everywhere within the system.
It is however treated as a separate tool, so things such as tab-completion within git are not available.
posh-git Module
In case you’re working with PowerShell and you have git installed, there is a PowerShell module available to help you work with git.
It will provide you tab-completion on git commands and branch names, which will make your life a lot easier.
This module is called posh-git and can be installed through the PowerShell gallery on your machine.
# (A) You've never installed posh-git from the PowerShell Gallery
PowerShellGet\Install-Module posh-git -Scope CurrentUser -Force
Or
# (B) You've already installed a previous version of posh-git from the PowerShell Gallery
PowerShellGet\Update-Module posh-git
Once the module is installed, you simply run 1 command to make sure it’s always loaded in your PowerShell profile, giving you the functionality ever time you start PowerShell
Add-PoshGitToProfileoh-my-posh Custom PowerShell profile
If you’re a common PowerShell user, you might know that you can modify your profile.
This allows certain modules, settings and configurations to be applied every time you start up a new PowerShell session.
One tool that can help make your PowerShell experience be more immersive is oh-my-posh, which allows for complete customization of your PowerShell profile.
The reason why it’s great for using with git, it because it has a lot of configurable options for git, for example showing you:
![]()
- If you’re currently working in a git repository
- If so, what branch you’re working on
- What the status is
- and much more
When working with Visual Studio Code
This guide focusses mainly on using the git commandline, but with the knowledge gained, should immediately translate to an IDE (Integrated Development Environment) such as VS Code.
Built-in functionality
Visual Studio Code has built-in Git support.
Most git commands can be initiated through the Command Palate (Ctrl+Shift+P) when typing Git:.
A lot of options are also availebl in the Source Control View (Ctrl+Shift+G).
Here are some basic operations:
Initialize Repository
- Open the Command Palette (
Ctrl+Shift+PorCmd+Shift+Pon macOS). - Type
Git: Initialize Repository.
Stage and Commit Changes
- Use the Source Control view (
Ctrl+Shift+GorCmd+Shift+Gon macOS). - Click the
+icon to stage changes. - Enter a commit message and click the checkmark icon to commit.
Branching and Merging
- Use the branch icon in the bottom left corner to create or switch branches.
- Use the Command Palette to merge branches.
Extensions
Visual Studio Code also has a Marketplace of Extensions, allowing you to extend the program’s capabilities.
There are also a large number of extensions available for Git, all providing their (unique) capabilities to the program.
Be sure to at least browse arround to see if they can make your life easier.